Since YouCan always offers flexibility, you can customize your product settings in bulk or individually. These settings are related to the page that customers are redirected to when clicking to purchase a product.
You have many options you can set up and sections you can either enable or disable. It all depends on your strategy and the nature of your business.
As a seller, you have ownership over your products. You can arrange how specific parts and buttons will appear when a customer clicks on a product to buy it. This way, you can update the settings depending on your customer’s feedback and find the template that suits them the best.
How to use the product settings page?
To configure your products, go to Theme and click on Product Settings.
You will then be redirected to a page where you can find four tabs to set up:
1. Sections: This page regroups all the elements that your customers will see next to the product’s picture and they are about to buy it. You have the option to change the order of each section by simply dragging them. You can enable or disable each section:
- Title: this refers to the title of the product you entered when you were creating the product.
Images: this refers to the images of the product.
Price: this refers to the price of the product.
Variants: this refers to the variants you added to the product.
Scarcity: it is an option that displays this message: Hurry! only 9 left in stock! It is used as a sales strategy to create a feeling of urgency in your customers and push them to buy the product as soon as possible.
Visitors: this option displays how many visitors are viewing the product at that instant. It helps to increase credibility and shows that your products are being viewed by other customers.
Countdown: this option helps you to create excitement over your product and the discount you are offering, it is a countdown displayed near the product that shows your customers the days left so they can benefit from what you are offering.
Description: This refers to the description of the product that you entered when you were creating it.
Add to cart + Quantity: you have the option to either enable or disable the Add to Cart option alongside the quantity of the product that the customers want to purchase.
2. Stock, visitors & countdown: this page helps you customize three options that we previously mentioned; Visitors, Stock (which refers to Scarcity), and Countdown. These three settings are fictional but they help you boost your sales by creating excitement over the product:
Custom visitors: you need to specify the minimum and the maximum number of visitors that can be displayed in this option. You need to set up the two sections since the number that appears near the product constantly changes so each time customers visit the product, they will see a different number.
Custom stock: you need to specify the minimum and the maximum number of this product in the stock that will be displayed in this option. You need to set up the two sections since the number that appears near the product constantly changes so each time customers visit the product, they will see a different number.
Custom countdown: you can customize the countdown and specify how many hours or minutes are left.
3. Advanced: this page helps you customize more settings to add your personal touch:
Add to cart button: if you want to change the sentence of the "Add to cart" button displayed on the product page, you can easily do it here. You just need to enter the text and click on save.
You also have these options you can customize:
Sticky on mobile: the sticky option means that the Add to Cart button will always appear on the customer’s screen when they are scrolling down. You can enable it when your customers are visiting your store from their mobile.
Sticky on desktop: same as sticky on mobile, the button will follow your customers when they are scrolling.
Quantity selector: it stands for a box that allows your customers to select the number of items they want to purchase. You can enable this option or disable it.
Skip cart: this option sends your customers directly to the checkout page so they can add and confirm the payment information.
Social sharing: this option allows your customers to share the link of your products directly to their social media. It is a great way to encourage them to share the products they like with their close ones. You can use Facebook, Twitter, and WhatsApp.
More settings: in this section, you have additional settings that you can customize. You can either enable or disable the following:
- Reviews: this option allows you to add comments and personalized reviews on your products to build credibility. Read this article to discover how you can customize this section.
- Truncate description: this option applies to your product’s description, if you have a long description, you can enable it so that your customers need to click on ‘read more’ to view the entire text. This option allows you to add as many details as you want in the description without ruining the product’s page structure and letting the Purchase button stand out.
- Related products: to increase your sales, you can add a bunch of products to be suggested to your customers when they are viewing a specific product. You have the option to either enable it or disable and if you want to find out how to set it up, read this article.
- Direct add to cart: This option allows your customers to add products to their shopping cart when directly from the homepage once they click on the Add to cart button.
4. Styles: This page allows you to change the colors and customize the design of the sections. You have many options that will help you to make changes to fit your store’s theme. You can edit four elements:
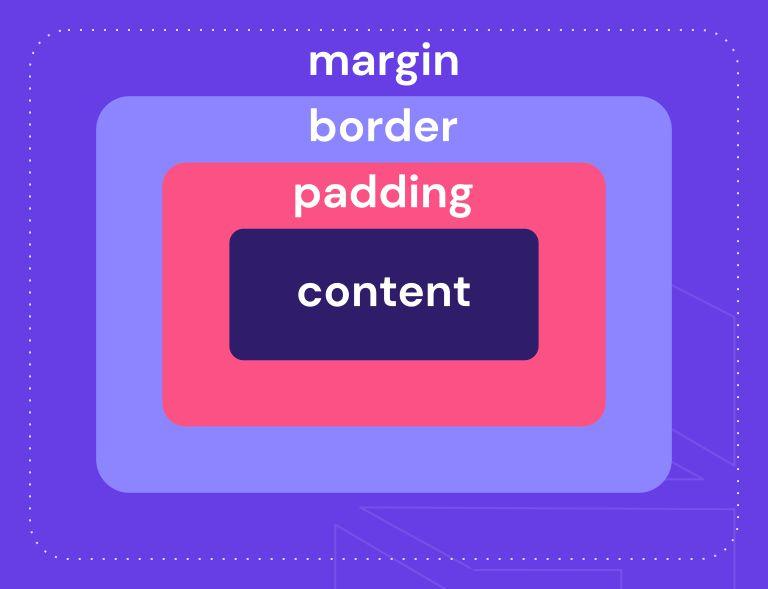
- Section: it stands for the sections you enabled to appear next to the product. You can customize the Padding size which stands for the space between each section, and you can also change the color of the background and text.
The following picture will put you in context to understand what Padding stands for:
- Product: You have the option to customize the colors of different elements related to the product: you can assign a color to your product’s link, change the color of the before and after related to the product’s price and change the color of the product’s title.
- Add to cart and Quantity: You can customize the color of the background and text of these two buttons and you can also personalize the settings of Hover.
Note: Do not forget to click on save after customizing each section.
If you want to find out more details and ways how to customize the theme of your store, read these articles.